
Overview
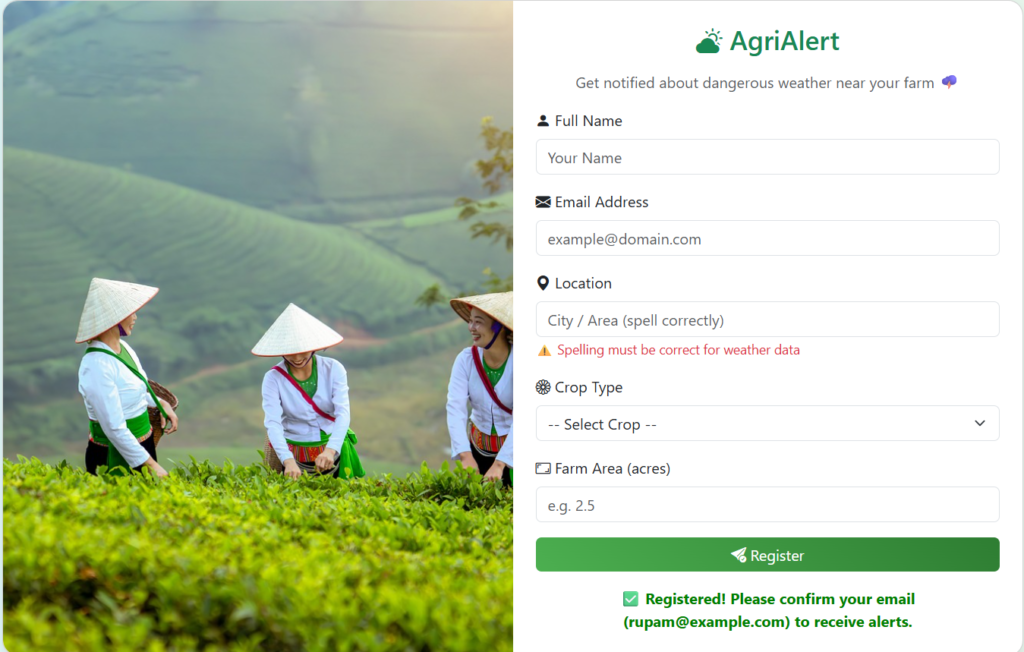
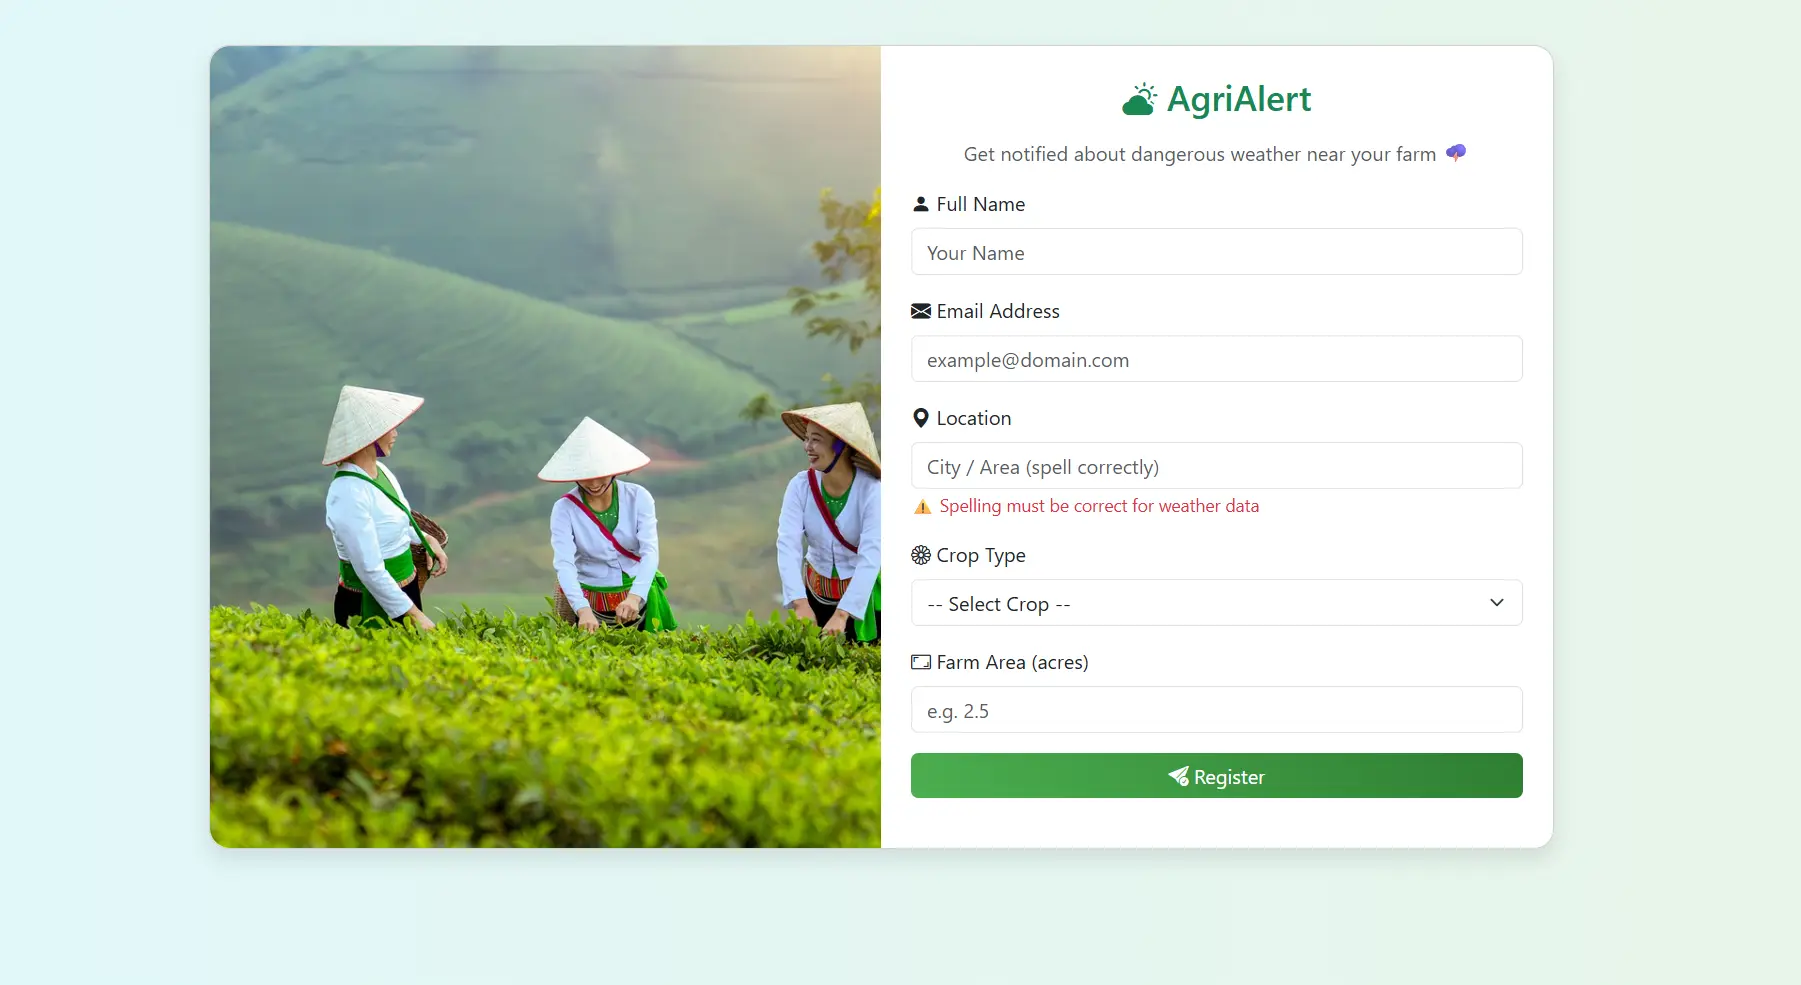
AgriAlert is a real-time weather alert system for farmers. It lets farmers register with their details and receive automated email alerts based on live weather data using the OpenWeatherMap API.
Objectives
- Enable farmers to register with name, email, location, and crop details.
- Use OpenWeatherMap API to fetch live weather updates.
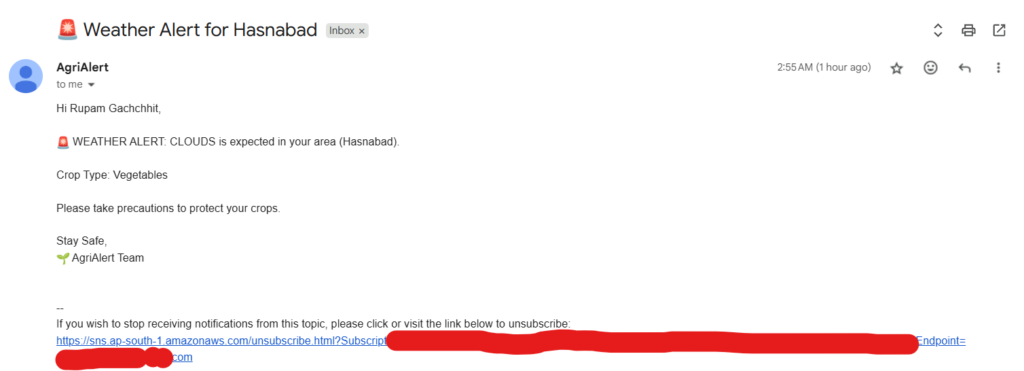
- Detect harmful weather and send real-time alerts via email using Amazon SNS.
- Automate daily weather checks using AWS EventBridge.
- Build a user-friendly frontend using HTML + Bootstrap + Axios.
Setup Instructions
1. DynamoDB Table
Table Name: Farmers
Partition Key: email (String)
Other fields will be added automatically: name, location, cropType, farmArea
Steps to Create DynamoDB Table:
- Navigate to DynamoDB Console: Open the AWS Management Console and search for “DynamoDB”.
- Create Table: Click on “Tables” in the left navigation pane, then click “Create table”.
- Configure Table Settings:
- Table name: Enter
Farmers - Partition key: Enter
email - Data type: Select
String - Leave other settings as default (e.g., default settings for read/write capacity, but you can choose On-demand for simpler management).
- Table name: Enter
- Create: Click “Create table”.
2. Register Farmer Lambda Function
Lambda Name: register_farmer Runtime: Python 3.12
This Lambda function handles farmer registration, stores their details in DynamoDB, and subscribes them to an SNS topic for weather alerts.
Lambda Code:
Python
import json
import boto3
import os
from decimal import Decimal

dynamodb = boto3.resource('dynamodb')
sns = boto3.client('sns')

TABLE_NAME = os.environ['TABLE_NAME']
TOPIC_ARN = os.environ['TOPIC_ARN']

def lambda_handler(event, context):
    try:
        body = json.loads(event['body'])

        name = body['name']
        email = body['email']
        location = body['location']
        cropType = body['cropType']
        farmArea = Decimal(str(body['farmArea']))

        # Store data in DynamoDB
        table = dynamodb.Table(TABLE_NAME)
        table.put_item(Item={
            'email': email,
            'name': name,
            'location': location,
            'cropType': cropType,
            'farmArea': farmArea
        })

        # Subscribe to SNS Topic
        sns.subscribe(
            TopicArn=TOPIC_ARN,
            Protocol='email',
            Endpoint=email
        )

        return {
            'statusCode': 200,
            'headers': {
                'Content-Type': 'application/json',
                'Access-Control-Allow-Origin': '*'
            },
            'body': json.dumps({'message': f" Registered! Please confirm your email ({email}) to receive alerts."})
        }

    except Exception as e:
        return {
            'statusCode': 500,
            'headers': {
                'Content-Type': 'application/json',
                'Access-Control-Allow-Origin': '*'
            },
            'body': json.dumps({'error': str(e)})
        }
IAM Policy for register_farmer Lambda:
This policy grants the Lambda function permissions to put items into the Farmers DynamoDB table and subscribe endpoints to the AgriWeatherTopic SNS topic.
Name: RegisterFarmerPolicy (or similar descriptive name)
JSON
{
  "Version": "2012-10-17",
  "Statement": [
    {
      "Effect": "Allow",
      "Action": [
        "dynamodb:PutItem"
      ],
      "Resource": "arn:aws:dynamodb:ap-south-1:8257xxxxxx:table/Farmers"
    },
    {
      "Effect": "Allow",
      "Action": [
        "sns:Subscribe"
      ],
      "Resource": "arn:aws:sns:ap-south-1:8257xxxxxx:AgriWeatherTopic"
    }
  ]
}
Note: Replace 8257xxxxxx with your actual AWS Account ID. You can find your account ID in the AWS Management Console.
Environment Variables for register_farmer Lambda:
These environment variables allow the Lambda function to dynamically retrieve the DynamoDB table name and SNS topic ARN.
| Key | Value |
REGION | ap-south-1 |
TABLE_NAME | Farmers |
TOPIC_ARN | arn:aws:sns:ap-south-1:8257xxxxxx:AgriWeatherTopic |
Note: Replace 8257xxxxxx with your actual AWS Account ID.
Steps to Create register_farmer Lambda:
- Navigate to Lambda Console: Open the AWS Management Console and search for “Lambda”.
- Create Function: Click “Create function”.
- Configure Function Settings:
- Author from scratch: Selected by default.
- Function name: Enter
register_farmer. - Runtime: Select
Python 3.12. - Architecture:
x86_64(default). - Execution role: Choose “Create a new role with basic Lambda permissions”. After creation, attach the
RegisterFarmerPolicyto this new role.
- Create function: Click “Create function”.
- Add Code: In the “Code” tab, replace the default code with the provided
register_farmerLambda code. - Configure Environment Variables: In the “Configuration” tab, go to “Environment variables” and add the keys and values as specified above.
- Save: Click “Deploy” to save your changes.
3. Weather Alert Lambda Function
Lambda Name: weather_alert Runtime: Python 3.12
This Lambda function scans the DynamoDB table for farmer details, fetches weather data from OpenWeatherMap, and sends alerts via SNS for bad weather conditions.
Lambda Code:
Python
import boto3
import urllib.request
import json
import os

dynamodb = boto3.resource('dynamodb')
sns = boto3.client('sns')
table = dynamodb.Table('Farmers') # Directly using table name as it's consistent

WEATHER_API_KEY = os.environ['WEATHER_API_KEY']
TOPIC_ARN = os.environ['TOPIC_ARN']

def lambda_handler(event, context):
    try:
        # 1. Scan DynamoDB Table
        response = table.scan()
        farmers = response['Items']

        # 2. Loop through each farmer and get weather data
        for farmer in farmers:
            location = farmer['location']
            name = farmer['name']
            crop = farmer['cropType']

            # Fetch weather from OpenWeather API
            # It's highly recommended to use Secrets Manager for API keys in production
            weather_url = f"https://api.openweathermap.org/data/2.5/weather?q={location}&appid={WEATHER_API_KEY}"

            with urllib.request.urlopen(weather_url) as res:
                data = json.loads(res.read().decode())

            condition = data['weather'][0]['main'].lower()

            # 3. Define bad weather conditions
            bad_conditions = ['rain', 'storm', 'clouds', 'thunderstorm', 'wind', 'hurricane']

            # 4. Send alert email via SNS if bad weather is detected
            if condition in bad_conditions:
                message = f"""Hi {name},

 WEATHER ALERT: {condition.upper()} is expected in your area ({location}).

Crop Type: {crop}

Please take precautions to protect your crops.

Stay Safe,
 AgriAlert Team
"""
                sns.publish(
                    TopicArn=TOPIC_ARN,
                    Subject=f" Weather Alert for {location}",
                    Message=message
                )

        return { "statusCode": 200, "body": " Weather alerts processed." }

    except Exception as e:
        return { "statusCode": 500, "body": f" Error: {str(e)}" }
IAM Policy for weather_alert Lambda:
This policy grants the Lambda function permissions to scan the Farmers DynamoDB table and publish messages to the AgriWeatherTopic SNS topic.
Name: WeatherAlertPolicy
JSON
{
  "Version": "2012-10-17",
  "Statement": [
    {
      "Effect": "Allow",
      "Action": [
        "dynamodb:Scan"
      ],
      "Resource": "arn:aws:dynamodb:ap-south-1:8257xxxxxx:table/Farmers"
    },
    {
      "Effect": "Allow",
      "Action": [
        "sns:Publish"
      ],
      "Resource": "arn:aws:sns:ap-south-1:8257xxxxxx:AgriWeatherTopic"
    }
  ]
}
Note: Replace 8257xxxxxx with your actual AWS Account ID.
Environment Variables for weather_alert Lambda:
These environment variables are crucial for the Lambda function to function correctly.
| Key | Value |
TOPIC_ARN | arn:aws:sns:ap-south-1:8257xxxxxx:AgriWeatherTopic |
WEATHER_API_KEY | 3fe7e51f5xxxxxxxxxxxxxxxxxxx495d (Replace xxxxxxxxxxxx with your actual OpenWeatherMap API Key) |
Note on WEATHER_API_KEY: For production environments, it is highly recommended to store your API key securely in AWS Secrets Manager or AWS Systems Manager Parameter Store and retrieve it programmatically in your Lambda function, rather than directly in environment variables.
Steps to Create weather_alert Lambda:
- Navigate to Lambda Console: Open the AWS Management Console and search for “Lambda”.
- Create Function: Click “Create function”.
- Configure Function Settings:
- Author from scratch: Selected by default.
- Function name: Enter
weather_alert. - Runtime: Select
Python 3.12. - Architecture:
x86_64(default). - Execution role: Choose “Create a new role with basic Lambda permissions”. After creation, attach the
WeatherAlertPolicyto this new role.
- Create function: Click “Create function”.
- Add Code: In the “Code” tab, replace the default code with the provided
weather_alertLambda code. - Configure Environment Variables: In the “Configuration” tab, go to “Environment variables” and add the keys and values as specified above.
- Save: Click “Deploy” to save your changes.
4. Create SNS Topic
The SNS topic will be used to send weather alerts to subscribed farmers.
Steps to Create SNS Topic:
- Navigate to SNS Console: Open the AWS Management Console and search for “SNS”.
- Create Topic: Click on “Topics” in the left navigation pane, then click “Create topic”.
- Choose Type: Select
Standard. - Details:
- Name: Enter
AgriWeatherTopic. - Display name: (Optional, but good for identification)
AgriWeatherAlerts.
- Name: Enter
- Access policy: Leave as default for now, the Lambda policies will grant the necessary permissions.
- Create topic: Click “Create topic”.
- Note ARN: After creation, note the Topic ARN. It will look something like
arn:aws:sns:ap-south-1:8257xxxxxx:AgriWeatherTopic. This ARN will be used in your Lambda environment variables.
5. Create API Gateway (HTTP API)
This sets up a public endpoint for your register_farmer Lambda function, allowing your frontend to interact with it.
Steps to Create API Gateway (HTTP API):
- Navigate to API Gateway Console: Open the AWS Management Console and search for “API Gateway”.
- Create API: Click “Create API” and choose “HTTP API” by clicking “Build”.
- Add Integration:
- Integrations: Click “Add integration”.
- Integration type: Select
Lambda function. - Lambda function: Select
register_farmer.
- API Name: Enter
AgriAlertAPI. - Review and Create: Click “Next”.
- Configure Routes:
- Method:
POST - Path:
/register - Integration target:
register_farmer(should be pre-selected).
- Method:
- Review and Create: Click “Next”.
- Define Stages: Leave defaults or customize if needed. Click “Next”.
- Enable CORS:
- Click “Enable CORS”
- Access-Control-Allow-Origins:
* - Access-Control-Allow-Methods:
POST - Access-Control-Allow-Headers: (Leave default or add more if needed, typically
Content-Typeis sufficient for this case). - Access-Control-Max-Age: (Optional)
- Create: Click “Create”.
- Note Invoke URL: After creation, go to the “Stages” section, then click on the default stage (e.g.,
$default). Note your Invoke URL, it will look like:https://abc123xyz.execute-api.ap-south-1.amazonaws.com/register
6. SNS Email Confirmation
Once a farmer submits the registration form via the API Gateway endpoint:
- Data is stored in DynamoDB.
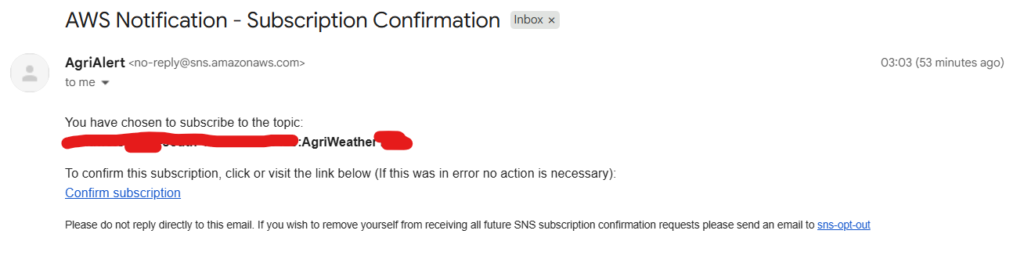
- SNS sends a confirmation email to the farmer’s provided email address.
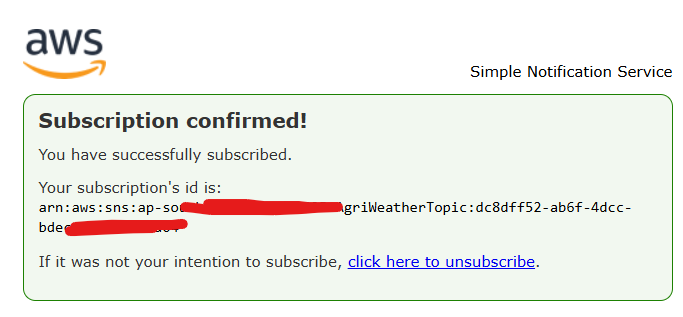
- Crucially, the farmer must click the confirmation link in the email to opt-in and receive future weather alerts. This is a security feature of SNS to prevent spam.
7. Schedule Weather Alert Lambda via CloudWatch (EventBridge)
This sets up a daily trigger for your weather_alert Lambda function to automatically send out weather alerts.
Steps to Schedule with CloudWatch (EventBridge):
- Navigate to CloudWatch Console: Open the AWS Management Console and search for “CloudWatch”.
- Create Rule: In the left navigation pane, click “EventBridge” -> “Rules”, then click “Create rule”.
- Define Rule Details:
- Name:
DailyWeatherAlertTrigger(or similar). - Description:
Triggers weather_alert Lambda daily at 6:30 AM.
- Name:
- Define Event Pattern:
- Event source: Select
Schedule. - Schedule pattern: Choose
Cron expression. - Cron expression: Enter
cron(30 6 * * ? *)- This expression means “at 6:30 AM (UTC) every day”. Adjust the time based on your desired local time and UTC offset. For example, if Kolkata is UTC+5:30, and you want it at 6:30 AM IST, you’d need to adjust the UTC time accordingly. For 6:30 AM IST, the UTC time would be 1:00 AM, so
cron(0 1 * * ? *).
- This expression means “at 6:30 AM (UTC) every day”. Adjust the time based on your desired local time and UTC offset. For example, if Kolkata is UTC+5:30, and you want it at 6:30 AM IST, you’d need to adjust the UTC time accordingly. For 6:30 AM IST, the UTC time would be 1:00 AM, so
- Event source: Select
- Select Targets:
- Target: Select
Lambda function. - Function: Select your
weather_alertLambda function from the dropdown.
- Target: Select
- Configure input: Leave as default (Matched event).
- Create rule: Click “Create rule”.
8. Deploying the Frontend (HTML)
This frontend provides the user interface for farmers to register.
Frontend HTML Code:
HTML
<!DOCTYPE html>
<html lang="en">
<head>
  <meta charset="UTF-8" />
  <meta name="viewport" content="width=device-width, initial-scale=1.0"/>
  <title> AgriAlert - Farmer Registration</title>
  <link href="https://cdn.jsdelivr.net/npm/bootstrap@5.3.0/dist/css/bootstrap.min.css" rel="stylesheet">
  <link href="https://cdn.jsdelivr.net/npm/bootstrap-icons/font/bootstrap-icons.css" rel="stylesheet">
  <style>
    body {
      background: linear-gradient(to right, #e0f7fa, #e8f5e9);
      font-family: 'Segoe UI', sans-serif;
      min-height: 100vh;
    }
    .card {
      border-radius: 1rem;
      box-shadow: 0 8px 16px rgba(0,0,0,0.1);
    }
    .btn-custom {
      background: linear-gradient(45deg, #4caf50, #2e7d32);
      color: white;
      border: none;
    }
    .btn-custom:hover {
      background: linear-gradient(45deg, #66bb6a, #388e3c);
    }
    .left-img {
      background-image: url('https://cdn.pixabay.com/photo/2024/10/27/07/12/women-9152739_1280.jpg');
      background-size: cover;
      background-position: center;
      border-top-left-radius: 1rem;
      border-bottom-left-radius: 1rem;
    }
    #message {
      font-weight: bold;
    }
    @media (max-width: 768px) {
      .left-img {
        display: none;
      }
    }
  </style>
</head>
<body>
  <div class="container py-5">
    <div class="row justify-content-center">
      <div class="col-lg-10">
        <div class="card">
          <div class="row g-0">

            <div class="col-md-6 left-img"></div>

            <div class="col-md-6 p-4">
              <h3 class="text-success text-center mb-3"><i class="bi bi-cloud-sun-fill"></i> AgriAlert</h3>
              <p class="text-muted text-center">Get notified about dangerous weather near your farm 🌩️</p>

              <form id="regForm">
                <div class="mb-3">
                  <label class="form-label"><i class="bi bi-person-fill"></i> Full Name</label>
                  <input class="form-control" name="name" placeholder="Your Name" required>
                </div>

                <div class="mb-3">
                  <label class="form-label"><i class="bi bi-envelope-fill"></i> Email Address</label>
                  <input class="form-control" type="email" name="email" placeholder="example@domain.com" required>
                </div>

                <div class="mb-3">
                  <label class="form-label"><i class="bi bi-geo-alt-fill"></i> Location</label>
                  <input class="form-control" name="location" placeholder="City / Area (spell correctly)" required>
                  <small class="text-danger"> Spelling must be correct for weather data</small>
                </div>

                <div class="mb-3">
                  <label class="form-label"><i class="bi bi-flower1"></i> Crop Type</label>
                  <select class="form-select" name="cropType" required>
                    <option value="">-- Select Crop --</option>
                    <option>Wheat</option>
                    <option>Paddy</option>
                    <option>Maize</option>
                    <option>Fruits</option>
                    <option>Sugarcane</option>
                    <option>Mustard</option>
                    <option>Vegetables</option>
                  </select>
                </div>

                <div class="mb-3">
                  <label class="form-label"><i class="bi bi-aspect-ratio"></i> Farm Area (acres)</label>
                  <input class="form-control" type="number" step="0.1" name="farmArea" placeholder="e.g. 2.5" required>
                </div>

                <button type="submit" class="btn btn-custom w-100"><i class="bi bi-send-check-fill"></i> Register</button>
              </form>

              <div id="message" class="text-center mt-3"></div>
            </div>

          </div>
        </div>
      </div>
    </div>
  </div>

  <script src="https://cdn.jsdelivr.net/npm/axios/dist/axios.min.js"></script>
  <script>
    document.getElementById("regForm").onsubmit = async function (e) {
      e.preventDefault();
      const form = new FormData(e.target);
      const input = Object.fromEntries(form.entries());

      try {
        const res = await axios.post(
          "YOUR_API_GATEWAY_INVOKE_URL", // <<<<< IMPORTANT: REPLACE THIS WITH YOUR ACTUAL API GATEWAY INVOKE URL
          JSON.stringify(input),
          { headers: { "Content-Type": "application/json" } }
        );

        console.log(" Response:", res.data); // CloudWatch-friendly log
        document.getElementById("message").innerText = res.data.message || " Registered successfully!";
        document.getElementById("message").style.color = "green";
        document.getElementById("regForm").reset(); // clear form
      } catch (err) {
        console.error(" Error:", err); // CloudWatch log
        const errorMsg = err?.response?.data?.error || " Registration failed. Please try again later.";
        document.getElementById("message").innerText = errorMsg;
        document.getElementById("message").style.color = "red";
      }
    };
  </script>
</body>
</html>
Steps to Deploy the Frontend:
The easiest way to host this simple HTML file is using Amazon S3 for static website hosting.
- Create an S3 Bucket:
- Navigate to the Amazon S3 console.
- Click “Create bucket”.
- Bucket name: Choose a unique name (e.g.,
agrialert-frontend-YOUR_ACCOUNT_ID). - AWS Region: Select
ap-south-1(or the same region as your other AWS resources). - Object Ownership: Select “ACLs enabled” and “Bucket owner preferred”.
- Block Public Access settings for this bucket: Uncheck “Block all public access” to enable public access for website hosting. Acknowledge the warning.
- Click “Create bucket”.
- Upload Frontend File:
- Save the HTML code provided above into a file named
index.html. - Before uploading, locate the line in the JavaScript section:JavaScript
"https://jb7got4nh4.dfdffgfgexecute-api.ap-south-1.amazonaws.com/register", // Replace with your full HTTP API endpointReplace"https://jb7got4nh4.dfdffgfgexecute-api.ap-south-1.amazonaws.com/register"with the actual Invoke URL of your API Gateway that you noted in Step 5. - In your S3 bucket, click “Upload”.
- Drag and drop or add your
index.htmlfile. - Click “Upload”.
- Save the HTML code provided above into a file named
- Enable Static Website Hosting:
- In your S3 bucket, go to the “Properties” tab.
- Scroll down to “Static website hosting” and click “Edit”.
- Select “Enable”.
- Hosting type: “Host a static website”.
- Index document:
index.html - Error document: (Optional, but recommended)
error.html(you can create a simple error page). - Click “Save changes”.
- Set Bucket Policy for Public Read Access:
- In your S3 bucket, go to the “Permissions” tab.
- Under “Bucket policy”, click “Edit”.
- Paste the following policy, replacing
your-bucket-namewith your actual S3 bucket name. This allows public read access to objects in your bucket.JSON{ "Version": "2012-10-17", "Statement": [ { "Sid": "PublicReadGetObject", "Effect": "Allow", "Principal": "*", "Action": [ "s3:GetObject" ], "Resource": "arn:aws:s3:::your-bucket-name/*" } ] } - Click “Save changes”.
- Access Your Frontend:
- Go back to the “Properties” tab of your S3 bucket.
- Scroll down to “Static website hosting” and you will find your “Bucket website endpoint”. This is the URL where your frontend is now hosted. Open this URL in your web browser.
Security Best Practices
- API Keys: As mentioned, avoid hardcoding
WEATHER_API_KEYdirectly in your Lambda environment variables in a production setup. Use AWS Secrets Manager or AWS Systems Manager Parameter Store to store these sensitive credentials and retrieve them at runtime.- AWS Secrets Manager: Ideal for database credentials, API keys, etc., as it supports automatic rotation.
- AWS Systems Manager Parameter Store: Good for configuration data and less frequently rotated secrets.
- IAM Least Privilege: Ensure your Lambda execution roles have only the necessary permissions (
PutItemforregister_farmer,Scanforweather_alert,Subscribefor SNS,Publishfor SNS). Do not grant*permissions unless absolutely required and justified. - CORS: While
Access-Control-Allow-Origin: *is used for demonstration, in a production environment, restrict this to your specific frontend domain(s) for enhanced security. - Error Handling: The provided Lambda functions include basic
try-exceptblocks. For a production system, implement more granular error handling and logging (e.g., using AWS CloudWatch Logs, AWS X-Ray for tracing) to quickly identify and resolve issues. - Input Validation: Implement robust input validation in your
register_farmerLambda to prevent malicious or malformed data from being stored in your DynamoDB table. - SNS Confirmation: The SNS email confirmation step is crucial for preventing unwanted subscriptions. Ensure users understand they need to confirm their email.
- Regular Security Audits: Periodically review your AWS configurations, IAM policies, and Lambda code for potential security vulnerabilities.