
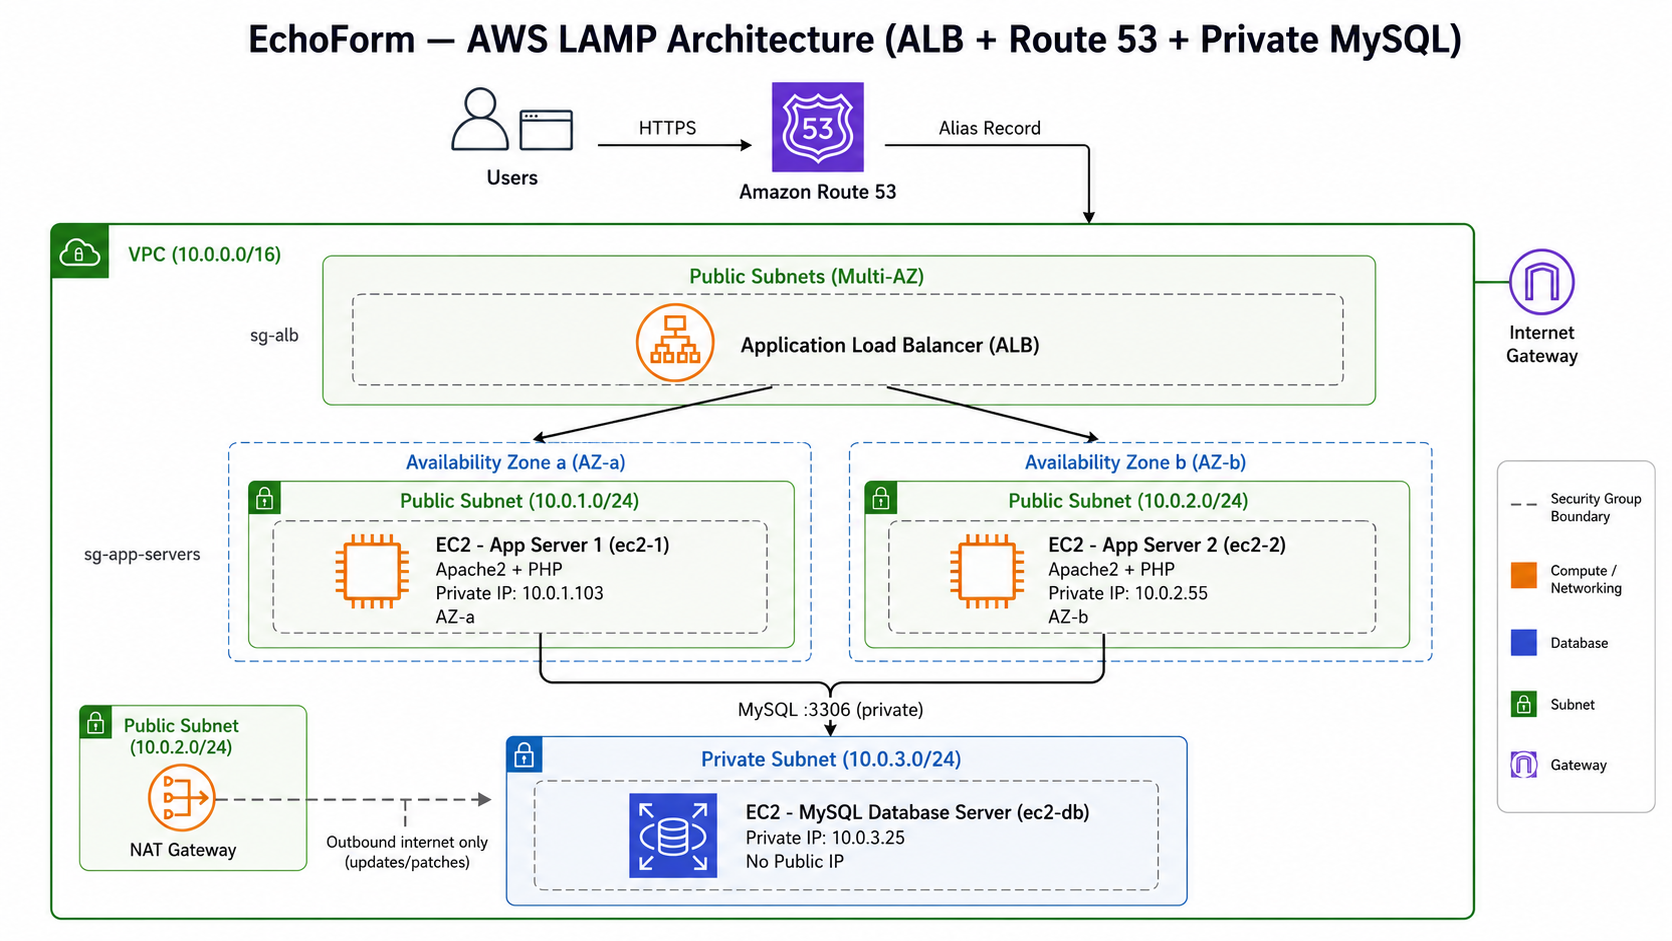

This guide walks through deploying two separate, simple web applications on two Ubuntu EC2 app servers (ec2-1 and ec2-2), each using Apache2 + PHP to collect form data, and both writing to the same MySQL database running on a third EC2 instance in a private subnet.
1. Architecture Overview
EchoForm — Step-by-Step Deployment Guide
Project: EchoForm — A Highly Available LAMP Web Application on AWS with Application Load Balancing (ALB), deployed across dual EC2 instances in different Availability Zones, with a private MySQL backend.
Follow these steps in order.
Phase 1 — Networking (VPC, Subnets, Gateways)
Step 1: Create the VPC
- AWS Console → VPC → Create VPC.
- CIDR block:
10.0.0.0/16. - Name:
echoform-vpc.
Step 2: Create the subnets
Create three subnets inside echoform-vpc:
| Subnet Name | CIDR | Availability Zone | Type |
|---|---|---|---|
echoform-public-az-a | 10.0.1.0/24 | AZ-a (e.g. us-east-1a) | Public |
echoform-public-az-b | 10.0.2.0/24 | AZ-b (e.g. us-east-1b) | Public |
echoform-private-db | 10.0.3.0/24 | Either AZ | Private |
Step 3: Create and attach an Internet Gateway
- VPC → Internet Gateways → Create → attach to
echoform-vpc.
Step 4: Create a NAT Gateway
- Allocate an Elastic IP.
- VPC → NAT Gateways → Create → place it in
echoform-public-az-a. - Assign the Elastic IP to it.
Step 5: Configure route tables
Public route table (rt-public) — associate with both public subnets:
| Destination | Target |
|---|---|
10.0.0.0/16 | local |
0.0.0.0/0 | Internet Gateway |
Private route table (rt-private) — associate with the private subnet:
| Destination | Target |
|---|---|
10.0.0.0/16 | local |
0.0.0.0/0 | NAT Gateway |
Phase 2 — Security Groups
Step 6: Create three security groups
sg-alb (attached to the ALB)
- Inbound: HTTP 80 from
0.0.0.0/0(add HTTPS 443 later) - Outbound: all traffic
sg-app-servers (attached to ec2-1 and ec2-2)
- Inbound: HTTP 80 from
sg-albonly - Inbound: SSH 22 from your admin IP or bastion only
- Outbound: all traffic
sg-db-server (attached to ec2-db)
- Inbound: MySQL 3306 from
sg-app-serversonly - Inbound: SSH 22 from your admin IP or bastion only
- Outbound: all traffic
Phase 3 — Launch EC2 Instances
Step 7: Launch the database server
- EC2 → Launch Instance.
- Name:
ec2-db. - AMI: Ubuntu 24.04 LTS.
- Subnet:
echoform-private-db. - Auto-assign public IP: Disabled.
- Security group:
sg-db-server. - Launch and note its private IP (yours is
10.0.3.25).
Step 8: Launch app server 1
- Name:
ec2-1. - AMI: Ubuntu 24.04 LTS.
- Subnet:
echoform-public-az-a. - Auto-assign public IP: Enabled.
- Security group:
sg-app-servers. - Launch and note both IPs (yours: public
100.58.215.82, private10.0.1.103).
Step 9: Launch app server 2
- Name:
ec2-2. - AMI: Ubuntu 24.04 LTS.
- Subnet:
echoform-public-az-b. - Auto-assign public IP: Enabled.
- Security group:
sg-app-servers. - Launch and note both IPs (yours: public
3.86.186.215, private10.0.2.55).
Phase 4 — Set Up the Database Server (ec2-db)
SSH into ec2-db via bastion/SSM (it has no public IP, so you cannot SSH directly from your laptop unless you go through a bastion or another instance).
Step 10: Install MySQL
sudo apt update
sudo apt install -y mysql-server
sudo systemctl enable mysql
sudo systemctl start mysql
Step 11: Allow remote connections
sudo nano /etc/mysql/mysql.conf.d/mysqld.cnf
Change:
bind-address = 127.0.0.1
to:
bind-address = 0.0.0.0
Restart:
sudo systemctl restart mysql
Step 12: Create the database, table, and users
sudo mysql -u root
CREATE DATABASE appdb;
USE appdb;

CREATE TABLE contact_submissions (
    id INT AUTO_INCREMENT PRIMARY KEY,
    name VARCHAR(100) NOT NULL,
    email VARCHAR(150) NOT NULL,
    message TEXT NOT NULL,
    source_instance VARCHAR(50) NOT NULL,
    created_at DATETIME NOT NULL
);

-- ec2-1 and ec2-2 are in DIFFERENT subnets, so grant both
CREATE USER 'app_user'@'10.0.1.%' IDENTIFIED BY 'YourStrongPasswordHere';
CREATE USER 'app_user'@'10.0.2.%' IDENTIFIED BY 'YourStrongPasswordHere';
GRANT SELECT, INSERT, UPDATE ON appdb.* TO 'app_user'@'10.0.1.%';
GRANT SELECT, INSERT, UPDATE ON appdb.* TO 'app_user'@'10.0.2.%';
FLUSH PRIVILEGES;
EXIT;
Use a real password, not the placeholder. Keep it noted somewhere safe — you’ll need the exact same value in Step 16.
Step 13: Confirm MySQL is listening
sudo apt install -y net-tools   # netstat isn't installed by default on 24.04
sudo netstat -plnt | grep 3306
You should see it bound to 0.0.0.0:3306.
Phase 5 — Set Up Each App Server (Repeat on Both ec2-1 and ec2-2)
Step 14: Install Apache2, PHP, and required extensions
sudo apt update
sudo apt install -y apache2 php php-mysqli php-curl libapache2-mod-php mysql-client-core-8.0
sudo systemctl enable apache2
sudo systemctl start apache2
php-curlis required — the app uses it to detect which EC2 instance is handling each request (source_instance). Skipping it causes an HTTP 500 error (Call to undefined function curl_init()).
Step 15: Test connectivity to the database server
mysql -h 10.0.3.25 -u app_user -p appdb
Enter the password from Step 12. If it connects, you’re good. If you get Host '...' is not allowed to connect, re-check the CREATE USER/GRANT for that server’s subnet in Step 12, and the sg-db-server inbound rule.
Step 16: Deploy the application files
On each server, copy the project files (from the app/ folder) to the web root:
sudo rm -rf /var/www/html/*
sudo cp index.html /var/www/html/
sudo cp submit.php /var/www/html/
sudo cp db_config.php /var/www/html/
sudo cp health.php /var/www/html/
sudo chown -R www-data:www-data /var/www/html
Edit db_config.php (identical content on both servers):
sudo nano /var/www/html/db_config.php
$DB_HOST = "10.0.3.25";
$DB_USER = "app_user";
$DB_PASS = "YourStrongPasswordHere";   // must match Step 12
$DB_NAME = "appdb";
Step 17: Restart Apache
sudo systemctl restart apache2
Step 18: Test each app server directly
Visit each public IP in a browser and submit the form:
http://100.58.215.82/http://3.86.186.215/
If you get an HTTP 500, check the error log:
sudo tail -50 /var/log/apache2/error.log
Confirm rows landed in MySQL (run on ec2-db):
SELECT * FROM contact_submissions;
Phase 6 — Application Load Balancer
Step 19: Create a target group
- EC2 → Target Groups → Create target group.
- Type: Instances.
- Protocol: HTTP, Port 80.
- VPC:
echoform-vpc. - Health check path:
/health.php. - Register targets: select both
ec2-1andec2-2.
Step 20: Create the Application Load Balancer
- EC2 → Load Balancers → Create → Application Load Balancer.
- Name:
echoform-alb. - Scheme: Internet-facing.
- Subnets: select both
echoform-public-az-aandechoform-public-az-b. - Security group:
sg-alb. - Listener: HTTP : 80 → forward to the target group from Step 19.
- Create the ALB.
Step 21: Confirm target health
EC2 → Target Groups → your target group → Targets tab. Both ec2-1 and ec2-2 should show healthy. If not, double-check /health.php exists on both servers and sg-app-servers allows port 80 from sg-alb.
Step 22: Lock down direct access to the app servers
Edit sg-app-servers and remove any rule allowing port 80 from 0.0.0.0/0. Only sg-alb should be allowed on port 80 going forward — users should only reach the app through the ALB (and later, Route 53), not the raw EC2 public IPs.
Phase 7 — Route 53 (Custom Domain)
Step 23: Create or use a hosted zone
If you own a domain (e.g. yourdomain.com) already registered, go to Route 53 → Hosted Zones → confirm it exists. If not, register or transfer your domain into Route 53 first.
Step 24: Create an alias record
- Route 53 → Hosted Zones → your domain → Create Record.
- Record name:
echoform(so it becomesechoform.yourdomain.com), or leave blank for the root domain. - Record type:
A. - Toggle Alias: Yes.
- Route traffic to: Alias to Application Load Balancer.
- Select the region and
echoform-alb. - Save.
Step 25: Test
Visit http://echoform.yourdomain.com (or your chosen subdomain). It should load the form and route to whichever app server the ALB selects.
Phase 8 — Verify End-to-End High Availability
Step 26: Submit the form multiple times
Refresh and resubmit several times through the domain name, not the raw EC2 IPs.
Step 27: Confirm both instances are being used
On ec2-db:
SELECT source_instance, COUNT(*) FROM contact_submissions GROUP BY source_instance;
You should see submissions attributed to both EC2 instance IDs, proving the ALB is distributing traffic across both Availability Zones while both write to the same shared database.
Download the complete project source code. It’s fully open source, free to modify, and comes with no author restrictions. Click the Download button below.




This Is a very Good Project