This walkthrough documents the end-to-end process of building a private, self-hosted VPN on Amazon Web Services. Instead of relying on a commercial VPN provider, this project stands up a dedicated cloud server running the open-source Pritunl VPN management platform, which manages an OpenVPN server underneath. The result is a personally controlled VPN endpoint for encrypting traffic, masking the originating IP address, and securely accessing resources through a single cloud-hosted exit node.
Goals
Provision a cloud virtual machine on AWS EC2 to act as the VPN host
Install and configure Pritunl, MongoDB, and OpenVPN on Ubuntu 24.04 LTS
Create a VPN organization, user, and server through the Pritunl web console
Generate and distribute a client connection profile
Connect a desktop client to the VPN and verify the connection is live
Confirm outbound traffic is correctly routed through the AWS-hosted IP address
Architecture Summary
A single EC2 instance acts as both the Pritunl management server and the OpenVPN endpoint. The instance terminates VPN connections from a client machine, encrypts/decrypts traffic, and routes it out to the public internet using the EC2 instance’s Elastic IP. MongoDB runs locally on the same instance to store Pritunl’s configuration, user, and organization data.
Component
Detail
Cloud Provider
Amazon Web Services (AWS)
Compute Service
Amazon EC2
Region
US East (N. Virginia) — us-east-1
Operating System
Ubuntu Server 24.04 LTS (HVM), 64-bit (x86)
Instance Type
t3.micro
VPN Software
Pritunl (Community Edition)
VPN Protocol
OpenVPN
Database
MongoDB 8.0 (local)
Storage
1 x 8 GiB EBS (gp) volume
Client App
Pritunl Desktop Client
Prerequisites
An active AWS account with permissions to launch EC2 instances and manage security groups
An SSH client (built-in Terminal on macOS/Linux, or PuTTY / Windows Terminal on Windows) — this walkthrough uses the AWS Console’s built-in EC2 Instance Connect browser terminal
A local machine to install the Pritunl desktop client on
Basic familiarity with the Linux command line
1. Launching the EC2 Instance
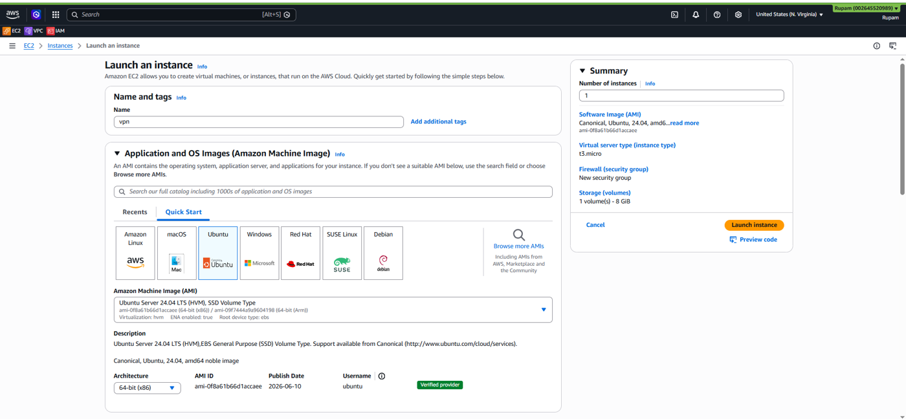
The VPN server begins life as a standard EC2 virtual machine, launched from the EC2 console using the Quick Start workflow.
Instance Configuration
Open the EC2 console and select Instances → Launch an instance
Under Name and tags, name the instance vpn
Under Application and OS Images, select the Ubuntu Quick Start tile using the Ubuntu Server 24.04 LTS (HVM), SSD Volume Type AMI for 64-bit (x86)
Under Instance type, select t3.micro — sufficient for a low-to-moderate traffic personal VPN and eligible for the AWS Free Tier
Create (or select) a key pair for SSH access
Create a new security group (rules covered below)
Leave storage at the default: 1 volume, 8 GiB
Review the Summary panel, then select Launch instance
Security Group (Firewall) Rules
Type
Protocol
Port Range
Source
Purpose
SSH
TCP
22
My IP
Administer the server
HTTPS
TCP
443
0.0.0.0/0
Pritunl web admin console
Custom UDP
UDP
10081 (or chosen port)
0.0.0.0/0
OpenVPN tunnel traffic
Security note: Restricting SSH access to “My IP” rather than 0.0.0.0/0 significantly reduces the attack surface. The OpenVPN UDP port must stay open to the internet so remote clients can establish tunnels from anywhere.
2. Connecting to the Instance via SSH
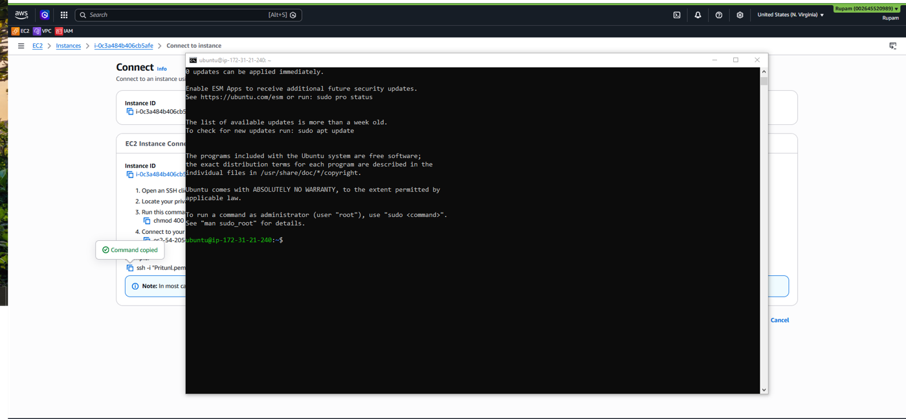
Once the instance is in the Running state, connect over SSH to install the software. This walkthrough uses the EC2 Instance Connect browser-based terminal (Instances → select instance → Connect).
EC2 Instance Connect opens a terminal session directly in the browser — no local SSH client setup required
The default username for the Ubuntu AMI is ubuntu
Alternatively, use the downloaded .pem private key with a local SSH client: ssh -i "key.pem" ubuntu@<public-dns>
3. Installing Pritunl, MongoDB, and OpenVPN
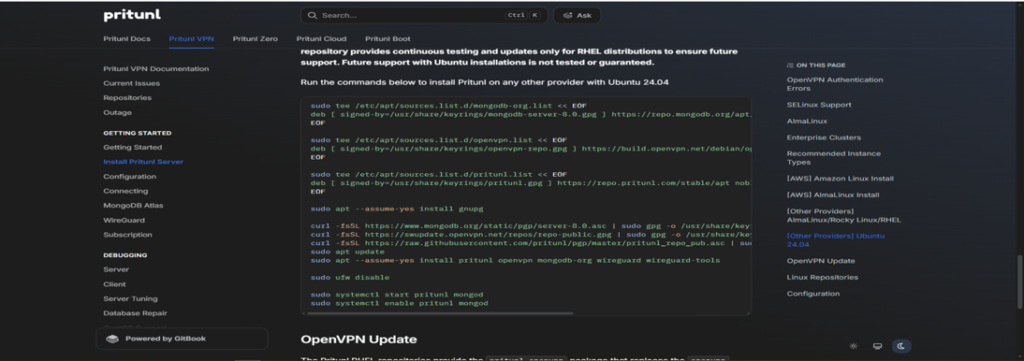
Pritunl provides a web-based management layer on top of OpenVPN and WireGuard, and requires MongoDB as its backing datastore. All three components are installed from their official APT repositories, following Pritunl’s official documentation for “Other Providers — Ubuntu 24.04.”
Adding the Repositories
sudo tee /etc/apt/sources.list.d/mongodb-org.list << EOF
deb [ signed-by=/usr/share/keyrings/mongodb-server-8.0.gpg ] \
  https://repo.mongodb.org/apt/ubuntu noble/mongodb-org/8.0 multiverse
EOF

sudo tee /etc/apt/sources.list.d/openvpn.list << EOF
deb [ signed-by=/usr/share/keyrings/openvpn-repo.gpg ] \
  https://build.openvpn.net/debian/openvpn/stable noble main
EOF

sudo tee /etc/apt/sources.list.d/pritunl.list << EOF
deb [ signed-by=/usr/share/keyrings/pritunl.gpg ] \
  https://repo.pritunl.com/stable/apt noble main
EOF
Note:sudo ufw disable turns off Ubuntu’s local firewall because traffic filtering is already handled by the AWS Security Group. In a production deployment, ufw can instead be configured to mirror the security group rules for defense-in-depth.
4. Initial Pritunl Setup
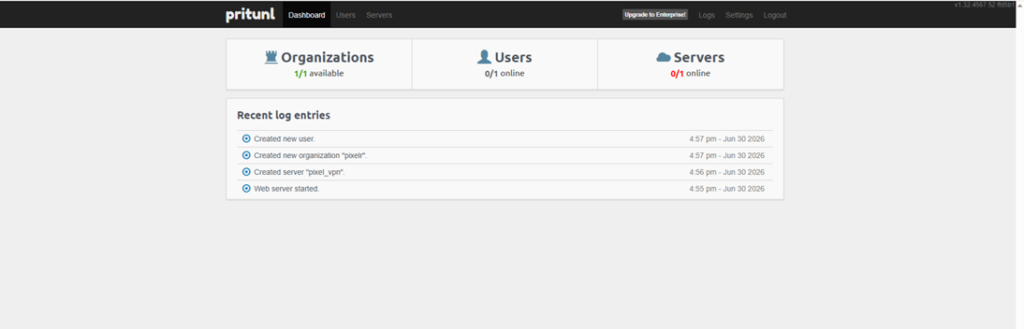
Once installed and running, Pritunl exposes a web-based admin console on port 443 of the server’s public IP. The first-run setup links the web console to the local MongoDB database and creates the initial administrator account, after which the Dashboard becomes available, summarizing organizations, users, servers, and a log of recent admin actions.
5. Configuring the Organization, User, and Server
Pritunl organizes access using a three-tier model: Organizations group Users, and Servers are attached to Organizations to grant their users VPN access. This project uses a single organization for simplicity.
Creating the Organization and User
From the Users tab, use Add Organization to create a new organization (named pixelr in this project)
Use Add User to create a user within that organization (named rupam)
Each user is automatically issued a unique cryptographic identity used to authenticate and encrypt their VPN session
Creating the VPN Server
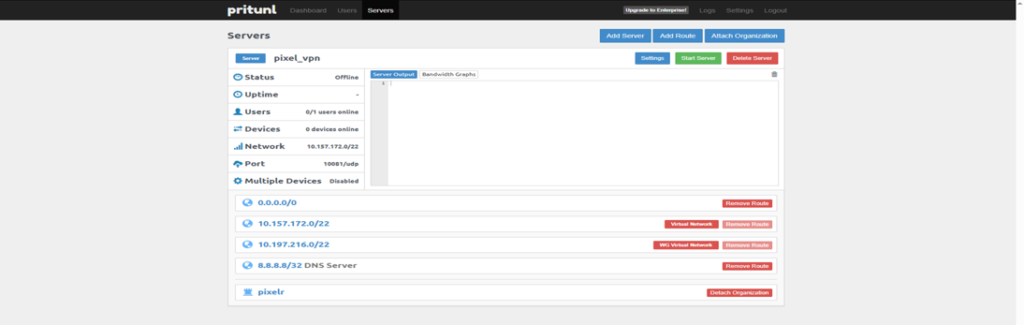
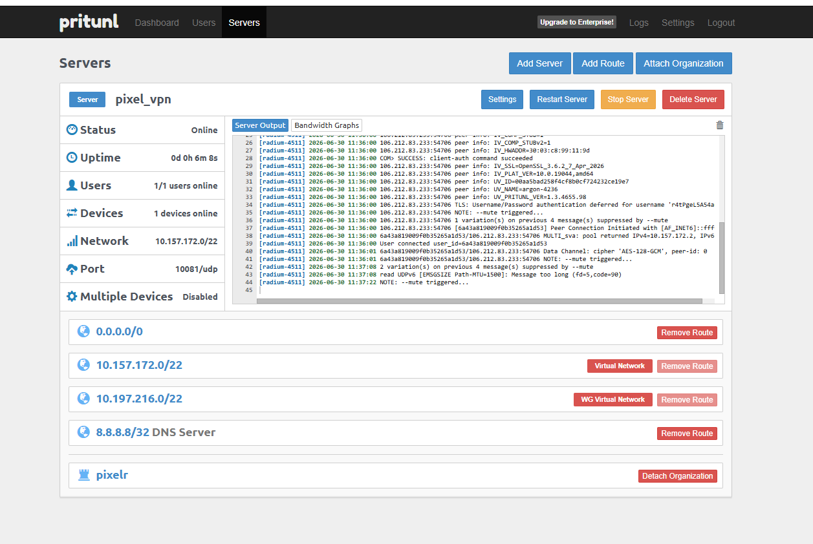
From the Servers tab, create a new server (named pixel_vpn). Pritunl auto-assigns a virtual network range for connected clients and a listening port for OpenVPN traffic.
Setting
Value
Server Name
pixel_vpn
Protocol
OpenVPN (UDP)
Port
10081
Virtual Network
10.157.172.0/22
WireGuard Network
10.197.216.0/22
Multiple Devices
Disabled
Attaching the Organization and Configuring Routes
Attach the pixelr organization to the pixel_vpn server, granting its users (rupam) permission to connect. Routes determine which traffic is sent through the VPN tunnel once a client connects:
0.0.0.0/0 — routes all internet traffic through the VPN (full tunnel mode)
10.157.172.0/22 — the OpenVPN virtual client network
10.197.216.0/22 — the WireGuard virtual client network
8.8.8.8/32 — a dedicated route for the DNS server used by connected clients
6. Starting the VPN Server
With the organization, user, server, and routes configured, start the server from the Servers tab using Start Server. Pritunl launches the underlying OpenVPN process and begins listening for client connections on the configured UDP port.
Status changes from Offline to Online
The Server Output panel begins streaming live OpenVPN log output
Uptime, connected Users, and connected Devices counters become active
7. Generating and Downloading the Client Profile
Each Pritunl user needs a connection profile — a bundle of certificates, keys, and server details required to authenticate and establish a tunnel.
Downloading the Profile
From the Users tab, the download icon next to rupam generates and downloads a profile archive (.tar) containing the OpenVPN configuration for that user.
Temporary Profile Links
Pritunl can also generate temporary, expiring URLs to the same profile — useful for sharing with a device that lacks admin console access, or for the Pritunl mobile client. Each link expires automatically after 24 hours.
Link Type
Format
Expiry
.tar profile download
https://<server-ip>/key/<token>.tar
24 hours
.zip profile download
https://<server-ip>/key/<token>.zip
24 hours
View profile links page
https://<server-ip>/k/<token>
24 hours
Pritunl Client deep link
pritunl://<server-ip>/ku/<token>
24 hours
8. Installing the Pritunl Desktop Client
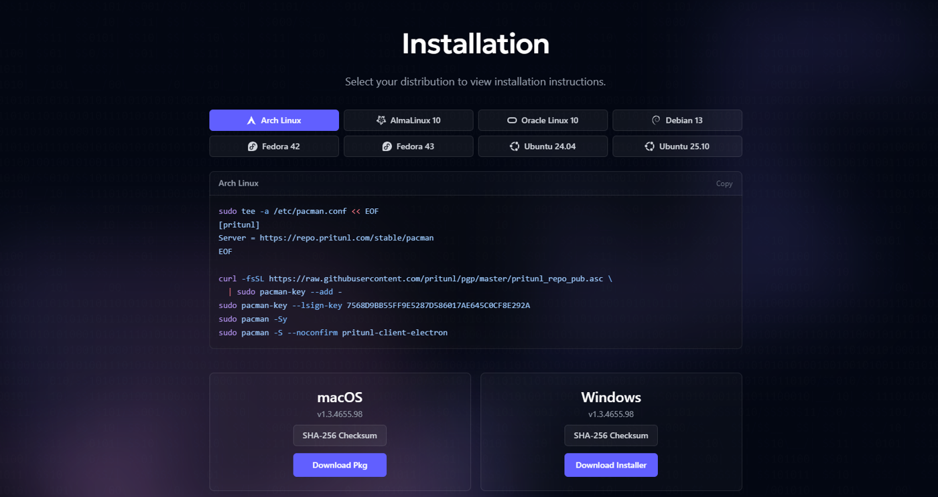
Install the Pritunl Client application on the local machine. Official installers and package-manager instructions are published for:
Open the Pritunl Client, choose Import, and select the downloaded rupam profile
Select the imported pixel_vpn profile from the client’s list and click Connect
Enter username/password if prompted, and confirm the connection status turns green/active
10. Verifying the Connection
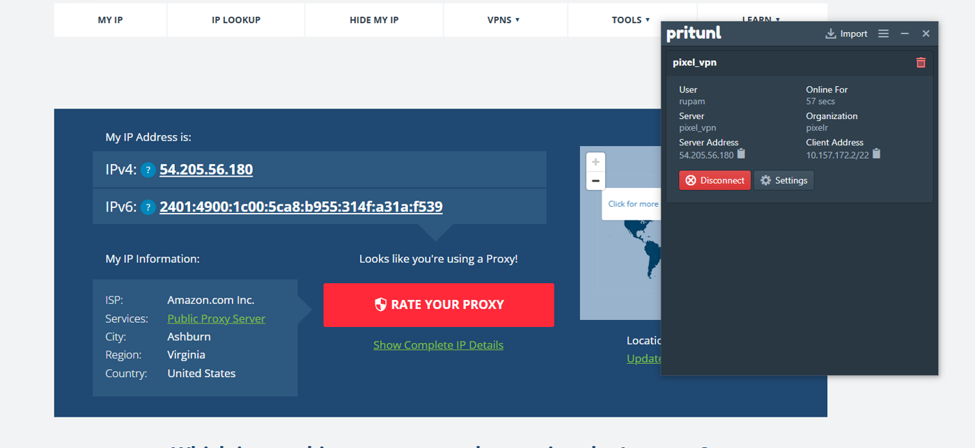
With the VPN connected, two checks confirm the tunnel is functioning: the public-facing IP address matches the AWS EC2 instance, and the server logs an authenticated client session
.
Server-Side Confirmation
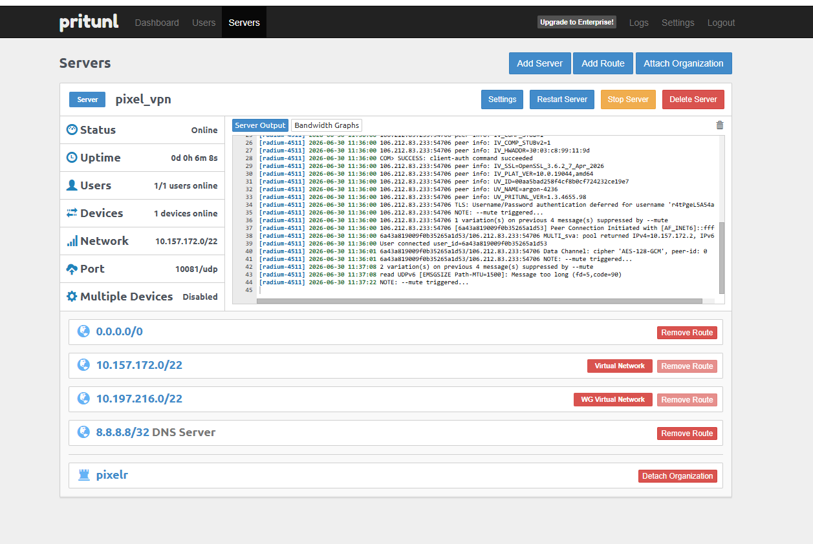
The pixel_vpn server shows Online status with one connected user and one connected device. The live Server Output log confirms a TLS authentication handshake succeeded and that a Data Channel cipher of AES-128-GCM was negotiated, alongside a successful client-auth command and an active radius authentication thread.
Throughput Test
A speed test run while connected confirms the tunnel is functional and measures real-world throughput through the EC2 instance, correctly detecting the connection as originating from Amazon’s Ashburn, VA infrastructure.
Results Summary
Metric
Result
VPN Server Status
Online
Connected Users
1 / 1
Connected Devices
1
Public Egress IP
54.205.56.180 (AWS / Amazon.com Inc.)
Detected Location
Ashburn, Virginia, United States
Cipher Negotiated
AES-128-GCM
Download Speed
128.55 Mbps
Upload Speed
7.04 Mbps
Ping
269 ms
Outcome: The deployment successfully routes a client device’s internet traffic through a self-hosted AWS EC2 instance via an encrypted OpenVPN tunnel. The connecting client’s apparent public IP, ISP, and geographic location all correctly resolve to the AWS instance rather than the client’s actual network, confirming the VPN works as intended.
Considerations and Next Steps
Hardening
Attach an Elastic IP so the public IP doesn’t change on stop/start or instance replacement
Re-enable and configure ufw on the instance to mirror the AWS Security Group rules as a second layer of defense
Restrict the Pritunl admin console (port 443) to a trusted IP range rather than 0.0.0.0/0
Enable two-factor authentication for Pritunl admin accounts
Replace the default self-signed certificate on the Pritunl web console with one from a trusted CA (e.g. via Let’s Encrypt)
Scaling and Cost
A t3.micro instance is sufficient for light personal use; higher concurrent user counts or throughput needs would warrant a larger instance type
Data transfer out of AWS is billed per GB beyond the Free Tier allowance — worth monitoring for VPNs used as a full-tunnel internet exit point
Pritunl’s Enterprise tier adds features like multi-factor authentication enforcement, more granular access control, and high-availability clustering for deployments growing beyond a single-server setup
Monitoring
AWS CloudWatch can be enabled on the instance to track CPU, network, and disk metrics over time
Pritunl’s built-in Logs tab provides an audit trail of administrative actions and authentication events
AWS Community Builder
Cloud Analyst, Cloud Security Researcher, and technical trainer based in the Greater Kolkata Area. I help teams migrate to AWS and teach cloud engineering through real projects.